Shift4Shop

Before You Begin
Please note that the CREDIT KEY team will need all of your domains before the app can be configured.
Installation
- Login into your 3Dcart store manager and click on the “Modules” from the left-hand side menu section.
- Search for the “REST API” module and click on the “Setting” button in the REST API module.
- This page will list all the REST API Apps installed within the store. Click on the “Add” button from the top right-hand corner
- Add the public key provided by CREDIT KEY in the input box and click “Save”.
- A popup will ask for the required permission for this App. Scroll down, check the checkboxes and click on the “Authorize” button to install the CREDIT KEY App.
After Installation, the CREDIT KEY App will be available on the REST API Apps page.
Setting
Once installed, a new CREDIT KEY menu item will be available in the admin navigation. Access the CREDIT KEY settings page via this menu item and select “Shipped” order status and “Cancel” order status.
Configuration
With CREDIT KEY installed, a new payment method will be generated by 3Dcart. Please expand the CREDIT KEY settings from the left side menu and select the Payment page. Click on the “Select Payment Methods” from the payment methods section. On the Payment Method page, find the new payment method created called “CREDIT KEY” as shown in the below image.
- Caption is used to rename this payment method.
- Check the Test Mode checkbox if you are using CREDIT KEY in “Staging” mode. Leave it unchecked if you are using production credentials.
- Public Key and Shared Secret will be shared by the CREDIT KEY team.
- By enabling this payment method, it will appear on the checkout page.
- Add Scripts for Submit Button Text
Navigate to Content > Site Content from the left side menu. Scroll down and edit the "Title & Content" section. Find the "Main Pages" section and expand it. Click on Checkout #1 which will take you to the checkout header and footer page. You need to add this script in the Footer section.
Please disable the WYSIWYG editor off before pasting the script.
Once the script is in place, please clear cache from the 3Dcart and hard reload the page before testing this feature.
Please note that this script will work for the default version of the core 3Dcart checkout template. This script might need to be modified if customizations have been made to the checkout page template.
<script type="text/javascript">
	jQuery( window ).load(function() {
	  	var CreditKeyID = jQuery("#divPaymentMethods .linkGateway input").attr('id');
	  	var checkoutButton = jQuery('#spanCheckout button').html();
	  	jQuery('#divPaymentMethods .linkGateway label').contents().filter(function(){
		    return this.nodeType === 3;
		}).remove();
		jQuery("#divPaymentMethods .linkGateway label img").css({"float":"none", "max-height":"24px", "vertical-align":"sub"});;

	  	if(jQuery('#divPaymentMethods .linkGateway input').is(':checked')){
	  		jQuery('#spanCheckout button').html('<i class="icon-basket"></i> Continue with CreditKey');
	  	}

		jQuery("#divPaymentMethods input[type=radio]").on("change", function(){
		    if(jQuery(this).attr('id') == CreditKeyID){
		    	jQuery('#spanCheckout button').html('<i class="icon-basket"></i> Continue with CreditKey');
		    }else{
		    	jQuery('#spanCheckout button').html(checkoutButton);
		    }
		});
	});
</script>
To add a description to the CREDIT KEY payment method you will need to edit the checkout-singlepage.html file in your theme.
There are two ways to access your site's templates:
-
Template Editor
To access the built-in template editor go to Settings >Design >Theme & Styles and click on the "Edit Template (HTML)" button found along the top right. Select the template you'd like to back up/edit and click its edit button. To make a backup, CTRL-A (select all) in the box where all the coding is, CTRL-C (copy) it, and CTRL-V (paste) it into a text editor like your computer's notepad program. Be sure to save the file with the same name as it has listed in the template editor. This helps minimize confusion later on when finding your file(s) -
FTP
A better way of accessing your template files is via FTP. When you signed up with 3dcart, you were sent your account's FTP login credentials. Use these to connect to your store and navigate via FTP to web/assets/templates/[themefolder] where "themefolder" is the theme your store is using. For example, if your site is using the default theme v40001, your FTP path will be web/assets/templates/v40001
If the checkout-singlepage.html file is not available in your theme then you need to download/access it from the common template and upload it in your theme.
Please follow this article for more details: https://support.3dcart.com/knowledgebase/article/View/388/5/website-content-guide---part-2
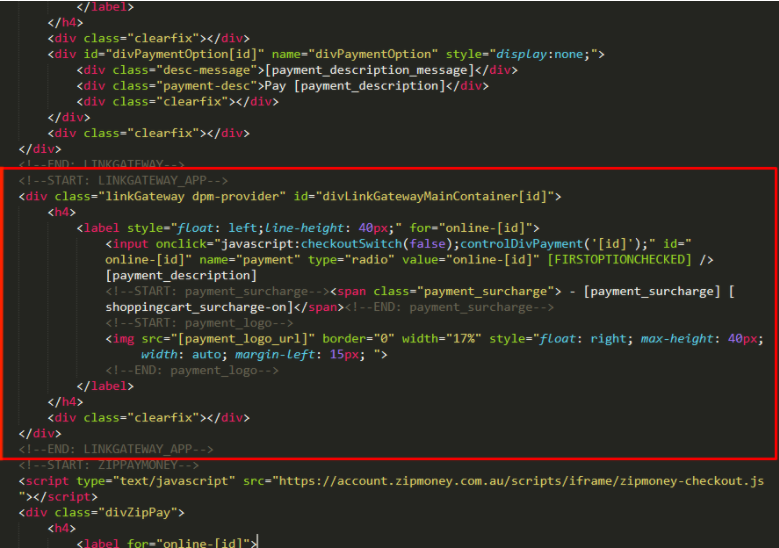
Once the checkout-singlepage.html file is available on your theme, please edit it via HTML editor and find for the code start with "" and end at "" as:

Replace this block of code with the following:
<!--START: LINKGATEWAY_APP-->
<div class="linkGateway dpm-provider" id="divLinkGatewayMainContainer[id]">
    <h4>
        <label style="line-height: 40px;" for="online-[id]">
            <input onclick="javascript:checkoutSwitch(false);controlDivPayment('[id]');" id="online-[id]" name="payment" type="radio" value="online-[id]" [FIRSTOPTIONCHECKED] />
            [payment_description]
            <!--START: payment_surcharge--><span class="payment_surcharge"> - [payment_surcharge] [shoppingcart_surcharge-on]</span><!--END: payment_surcharge-->
            <!--START: payment_logo-->
            <img src="[payment_logo_url]" border="0" width="17%" style="float: right; max-height: 40px; width: auto; margin-left: 15px; ">
            <!--END: payment_logo-->
        </label>
    </h4>
    <div class="clearfix"></div>
    <div id="divPaymentOption[id]" name="divPaymentOption" style="display:none;">
        <div class="desc-message">[payment_description_message]</div>
        <div class="clearfix"></div>
    </div>
    <div class="clearfix"></div>
</div>
<!--END: LINKGATEWAY_APP-->
Please note that this HTML code is for the core theme only and merchants can change this code as per their layout.
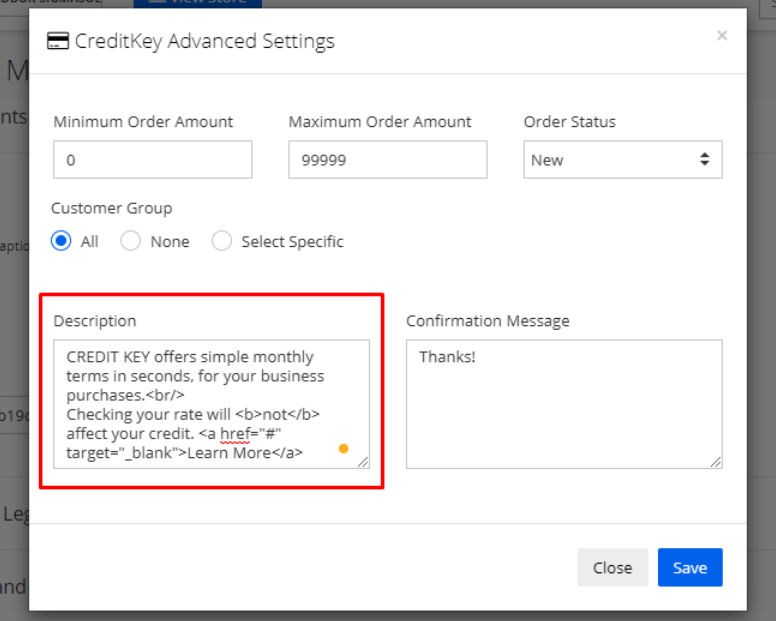
Then go to the payment method page and add the below HTML code in your Description file as:

Suggested Payment Method Description:
CREDIT KEY offers simple monthly terms in seconds, for your business purchases.
Checking your rate will not affect your credit. Learn More
Please set the "Learn More" link in the href placeholder.
You will now see the description below the CREDIT KEY payment method on the checkout page.
Questions? Contact Credit Key Support
Updated 2 months ago
